Thursday, July 30, 2015

More Frostgrave Warband Figs


Doing a little bit of catch-up after a few days off from painting.

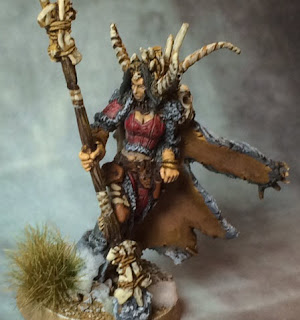
First is a fig from Reaper that will mostly likely be my big boss wizard for Frostgrave.


Then we have a Citadel dark elf assassin that I came across in a tub of old goodies.  He'll make a great thief.


And yes, I've been working on treasure tokens as well.  This is a piece that's been on the shelf unpainted for 15 years!  It came in a pack of Foundry vikings.


Wednesday, July 29, 2015

Frostgrave: Wizard? Apprentice?


I finished up this reaper mini and I am trying to decide if she will make for a good wizard model or apprentice model.


Regardless, snow will be added to the base later!

Monday, July 27, 2015

Oldhammer

Sunday night was a rule-book-flipping party for 3rd Edition Warhammer.  We threw down about 1000 points of wood elves and greenskins.  It was a lot of fun to run through various situations and challenge our brains to go back to the old way of thinking and playing. Overall, we got back into the groove a little more easily than I think either of us expected, so hopefully we can bring the hammery goodness to others!

And even through it wasn't a 'real' game, it still deserves a little bit of a write-up.

The wood elves and orcs square off across a plain.


Orc skirmishers take to the ruins, hoping for a decent vantage point.  In the background, mounted elven lords jockey for position with a unit of boyz.


This troll was perfectly positioned to jump into combat with the elven lords and assist the orcs.
Then he spotted a butterfly and wandered off.

The elves managed to rout the orcs after a couple rounds of combat and spook the troll in the process.
By the end of the game he had meandered all the way to the opposite long end of the table.


The troll and goblins panic as the orcs are routed by the elven cav, but not before the goblin shaman caused major havok on the elves with a couple rounds of wind spells.  The shaman managed three consecutive turns of denying an archer unit its shooting phase: MVP.


In the final round a unit of elves are charged by the other orc unit, led by Gutspilla the level 10 orc hero on a war boar, and another troll, This proves to be too much for the elves; they rout and their neighbor unit panics and flees off the table.  Waaagh!


So what did we learn? Quite a bit, but here are some highlights.

  • The magic system is very different and pretty exciting.  It's probably most effective in the first couple of turns and then less so once units start getting into proper scraps.  Not having the winds of magic and dispel rolls was pretty refreshing.
  • Movement is more rewarding and more restrictive, so it's important to know the movement rules cold.
  • Reserve moves are AWESOME.  Lots of nice ways to apply that mechanic.
  • Combat is handled so well.  The push-back rules are so helpful in providing good sensible combat.
  • Trolls are stupid.  As they should be.


Sunday, July 26, 2015

Building Frostgrave: Week 8


More of the Same: This week was all about the building details.  Detail, undercoat, airbrush, repeat!  By now all my buildings have been detailed which is great.  Below you can see the inn ready to have it's roof modeled on and be primed dark brown.


The inn was one of 8 buildings that got detail work completed this week and it feels good to get that part done with.  I put together roughly 3 buildings at a time and then undercoated them dark brown.  We had some nice weather this week so it wasn't a problem for me to spray them and leave them outside for awhile to dry.


They then came back into the basement where I airbrushed the roofs and siding.  At this point all but two buildings have completed this process.  The Inn and the Companion Hall have been detailed and are awaiting a time for me to undercoat them.  The Companion Hall was a bit tricky to get the roofing materials to look right, but I think it came out looking ok.


I did run into one problem where my metal ruler went missing.  I'm 99% sure Maddy had something to do with that...  

For Sale:  Lastly, since it was a bit monotonous going through all those buildings, I decided to take a break and make some market stalls.  I have a set of Warlord Game's produce set that I'll paint up and place in them to make the city look a little more "lived in."  


Next week I hope to create a few more little pieces of scatter terrain to liven up the board a bit and give the game some cover between the buildings.  But right now I have to finish two large buildings and paint the trim, doors, and windows of the majority of the houses.

Next up an action shot of the WIP board.


And finally a shot of the board where it stands at week 8 followed by a shot of where I drew inspiration from - Whiterun,


Wednesday, July 22, 2015

Frostgrave - Day 6


Barbarian?  Thug?  I don't know yet.  But this lady-Conan from Reaper will be a great addition to the warband.


Thugs and a Hound


In preparation for Frostgrave I thought I would use some free time to prep some old models for use in the frozen city.  I re-purposed some GW chaos marauders to be my thugs and a warhound to be my dog.  I figure they would look good alongside a Witch, Necromancer, or other devious type of wizard.  I think they will look particularity great with a barbarian in the group as well.


And if you have seen the last post, you know know that this doggie doesn't need a handler!

Tuesday, July 21, 2015

Frostgrave - Day 5


Another fun model from Foundry's viking range, this will be used as a 10-point warhound.  That brings our total to 300/500.
And according to tracking info, the rulebook will be waiting at home after work tonight!


Monday, July 20, 2015

Building Frostgrave: Week 7


Real Time:  I am now in real time.  As in you won't see a new post for at least one week because it is currently today.  Unless you are reading this post later, than never mind.

Since it is summertime, I have been spending time with my family so didn't work too much on the board this week.  Not complaining, just stating a fact! My goal is to finish by the first week of August, so I think I am still doing ok.  I added more balsa wood framework to 3 more buildings as well as the thatched roof to all three.  I even changed the base paint for some of the buildings so that they would standout a bit more from each other.  So the two major building colors will be brown and khaki.  I know, wild and crazy!

I didn't have time to paint the posts, door or windows, but you can at least see the difference in building color from last week's test model.

More balsa wood:  I also began adding more balsa wood framework to the next section of buildings.  The major problem was that my local craft store ran out of balsa wood, so I only have 5 pieces left and 5 buildings to use them on!  I may have to make a stop to Manchester to find some more.  With only two weeks until my goal date, this could slow me down.


In the upper sections of my board the houses got a bit more glamorous with their dormers and larger footprints.  Unfortunately this required more balsa wood.

Anyway, it was time to go camping for a few days so I took a picture of the board so far.  Almost 4 buildings completely painted out of 12!  1/3rd of the way there isn't too shabby.


Finally, my action shot:


Hopefully I will be able to put a good dent into the board this week as I know the Frostgrave books will be shipping.  I would love to get a game on it soon!

Building Frostgrave: Week 6


The Devil is in the Details:  I began working on the details for the buildings.  I carved about 12 chimney's worth of bricks into the buildings.  Some buildings were so long I decided that they needed two chimneys.  Man that was dumb on my part!  At least they look good.


I then started to add balsa wood posts onto the buildings as well as doors.  For the windows I used a square punch on some old cereal boxes and used an X-acto knife to carefully carve out the shutters.  Then I got a big purchase in the mail.  I should really say it was a heavy purchase.  I ordered about 12 pounds of DAS modeling clay to use as the thatched roofing for the buildings.


That is what 12 pounds looks like.  Sorry, Mr. Mailman for having to lug that all around!  I added the modeling clay to the test building.  I used a toy wooden roller my girls weren't using and spread out a chunk of the clay.  I laid it on the roof and using an old tooth brush I pushed into the clay creating a thatched roof look.


I think it looks pretty good.  However next time I am going to layer on the modeling clay in strips to make the thatched roof look more convincing.  The next day when the roof was dry I took it out back and hit it up with a dark brown spray paint.  I used my airbrush to paint the roof and the exterior walls and then with a trusty brush painted the wooden posts and the door.


Yes, I think this will work!  The rest of the week I spent adding balsa wood to some of my buildings.  Finally, my action shot:


Building Frostgrave: Week 5


No Chimneys?  I never realized it but in Skyrim's city of Whiterun, the buildings I was modeling everything after didn't have chimneys!  It must be fairly warm with that dragon flying around I suppose.  An old building without a chimney just didn't feel right to me so I went to work carving them out.  I used the insulation foam to measure the width and height of each chimney and then carved in a "v" shape so that I could squeeze them onto my building.


I would then spend the next couple of weeks meticulously carving the brick work into each one.  I apparently didn't learn my lesson when I carved in the cobblestone paths.

Companion Hall:  One of the side quests in Skyrim was to join the companion guild.  Their building was even located in my zone on the board.  The problem was that the building was oval shaped!  I had to cut little grooves into the foamboard so that I could get it to bend without snapping off.


Once I had four sides completed I attached them together with the other supports to create the basic building shape for my companion hall.


With similar cutting I added the foamboard ceiling and using some cardboard cereal boxes I was able to cover the end pieces.  I spakled the building to cover up the cuts where the building curved and now I have the shell for my companion hall.


Homes: While I was working on the companion hall I was also constructing more houses as well.  This time focusing on the market place from Whiterun.  By the end of week five, the entire board began to look like this:


Ah, progress.  This place is starting to look like an actual medieval town!  And lastly, my action shot.


Building Frostgrave: Week 4


Walls:  Now that my board was covered in snow, the next process was to make the place look livable.  This was going to require a lot of buildings.  Part of that was the wall structure that separates the two halfs of Whiterun.  I already built the turrets and the walls the previous week.  I then had to paint them.  I had initially carved out a spot for a door and placed some balsa wood to into the turrets to represent the door.  (I had made a conscious effort not to make structures that you can go inside as most games we have played used buildings as line of sight blocking terrain.) I once again added a double coat of watered down black paint.


With the walls dried I went about dry brushing them grey followed by a very light dry brush of white to highlight the edges.  

Houses: I then went on to make houses.  I kept the floor plan very simple and cut out basic 4"x4" structures out of foamboard.  I hot glue gunned them together and very quickly I had the basic structure of a building.  I should have used a different color foamboard as the structures blend in with the white snow.  Not great for photography, but white foamboard is a lot easier on the wallet.  Besides, they would be painted soon anyway!


Seven total buildings and some walls.  So far so good!  I decided to start taking action shots to end my email to my friends.  So I'll do the same here as well!

'

You can barely make out the little fire wizard in the distance!

Building Frostgrave: Week 3


Day 1 - Paint it Black...and then brown:  After a lot of carving I finally finished etching the cobblestone.  I then applied the watered down black paint to the last two board sections and I felt that it was looking pretty good.  I painted everything else brown to hide any pink foam from peaking through later on.


Day 2:The next step was to add sand to the board.  I decided to coat all the brown sections in sand, even though I fully knew I would cover it with snow later.  I figured it was better to be safe than sorry.  My daughter Olivia helped my add glue to the board and sand it too.  She was a big help!


Day 3: Once the glue had fully dried I watered down some brown paint and went over the sandy sections.  Then it was hurry up and wait until the next day!


Day 4: It was time to dry brush the sand.  Again, I figured it may be pointless to dry brush the entire board, but if some snow didn't cover an area I missed it was going to be more difficult to touch it up later.  Then I mixed white glue with some baking powder and made a nice snow concoction.  I spread it over the board leaving the edges of the cobblestone free of snow so you could see a bit of the earth.


After I applied it I started feeling colder just looking at it.  I applied the snow mixture to the top of the stone walls of the staircase and a bit of snow to the cobblestone walkway to make it look like areas where wagons passed by on the wider roads.  Lastly I started working on the wall system that separates the lower section from the upper section.  I didn't want a continuous wall as it would divide game play and create too many bottlenecks, so I decided that the wall would be a bit run down.


I felt that week three saw a lot of visible progress and worst case scenario, I have a playable board!  With June almost over I was feeling like I was in good shape.  Now to focus on the terrain pieces.

Building Frostgrave: Week 2


Cobblestone Madness: Week two continued with a lot more work carving out cobblestone.  After dumping countless hours into it I had a very big fear that once I added paint to the board, the paint would hide all my hard work.  I took out some black paint and watered it down to easily fill in the cracks around the cobblestones.


It took two coats of watered down black paint, but I was happy that it didn't washout the cobblestone.  
Adding Depth:  Carving each stone by hand was mind-numbingly boring and began to hurt my hand.  So I would take turns carving stone and then terraforming my board.  In the above picture you can see that I have a slopped hill.  I did this with other sections as well, including adding two staircases in different board sections.  In Whiterun (my inspiration from Skyrim) there are larger walkways leading to a more upper class section of the town. So I added in a much smaller stairwell to represent it.  I'm trying to keep playability in mind!


Rock and Roll:  In the upper section I decided to make it more rocky and less hilly.  I took out the hobby knife and started carving into it to create rock.  This was actually kind of fun, easy to do, and a bit therapeutic taking out any anger issues on the poor defenseless pink foam...


Finally, a look at what the board looks like at the end of week 2:


Building Frostgrave: Week 1


Forward:  The following series of posts have already been completed up to week 7.  My friends were complaining that all the pictures I was taking was crashing their data plans so I should place it in blog format.  So to humor them, I am rewriting/reposting what they have seen.  Of course from week 7 onward is all up in the air as that is where I am currently at in real time.  Enjoy!

Frostgrave: Awhile ago, my friends James and Brennan sent me a link to a new medieval skirmish game called Frostgrave that was soon to come out.  I had always enjoyed Mordhiem, but this new game was focused around a wizard and his party.  Normally wizards had always been supporting characters, so this intrigued and I preorded the rules.  Then I thought about the terrain that I had for a medieval game settings and knew that if I wanted to truly get into this game, I was going to have to step up my supply of buildings.  The one ruin, few hills, and scattering of trees I had for a medieval setting was just not going to cut it.  Besides, this was a frozen city.  I was going to need a new board as well.  I don't normally play in the snow!

Skyrim - The not so frozen city: Now that I had committed myself to creating some terrain I needed some inspiration.  I had/still am a big fan of Skyrim.  The world was fun and I really enjoyed playing it for countless hours at night.  So I went through the major cities in the game and decided that the first major city in the game we play out of would be a good inspirational point for a game.  Whiterun it was.


I cropped the map of Whiterun to get a sense of what a 4'x4' board would look like.  Then it was off to the store.


I layered the pink foam insulation so that there was a notable rise in the different sections of the board.  Nothing too high as I didn't want miniatures to fall over.  I then began to carve out the layout onto the pink foam using a pen.  I added some extra roads as in the future I would like to be able to rotating each 2'x2' board section to get a different layout.

Finally, it was on to carving out the cobblestone streets.  Wow, I didn't realize how long it was actually going to take to do this!  After one hour, here was my progress:

Yup, it was a sad little road for the amount of time I put into it.  Considering this began toward the beginning of June, this was going to be a long process.  Good thing I had 2 months before the book came out!

Frostgrave - Day 4


Bringing us up to 290/500 points is another lowly thug.  This is a bondir from the Foundry viking line.  Nothing fancy here - have sword, will slash.