Monday, September 28, 2015

USAriadna Marines - The Devil Dogs

The USMC in space is represented by giant raging dog men.  Must be a European thing.  This pair is one of the most visually different in the US box, mainly due to its size.  Dog warrior models have come a long way!

Extremely Impetuous werewolves on 40mm bases are nothing new to Ariadna, but these guys do bring a host of new things to our low-tech list that you don't normally get exposed to if you're commanding a Cameronian or a traditional antipode pack.


Devil Dog

The leader of the unit, this beast is similar to a transformed dog warrior or a Cameronian: Courage, Total Immunity (ha ha, Pan-O!), and Super-Jump.  He's a sprinter at 6-4 MOV and has all the stats to get in your face and shred you.  CC 21, PH 16, ARM 4.  His BS is a meager 10, but like other dog warriors, he's smart enough to come with chain rifle.  He can have that with smoke grenades and an AP heavy pistol or go for heavy shotgun and smoke for another 9 points.  Option 1 seems like it makes more sense, but heavy shotguns are pretty rad.

Oddly enough, Devil Dogs are AVA 3.  That breaks out from the Max-2 dog warriors norm, so go nuts.  The K-9 is AVA 1, but that seems to apply to a max of 1 per Devil Dog.

K-9 Antipode

The antipode is fast and sneaky.  He's got 6-6 MOV as well as Kinematika L2 and PH 15, so he can move and dodge very quickly,  CH: Mimetism puts him at -3 to hit.

Given that the pair will probably be toward the front lines, Sensor will come in handy. Sensor lets you make a discover roll with a +6 bonus to find all enemies within the model's zone of control.  Range, Camo, and Hiding mods don't count - you can't hide from an antipode's nose.
The +6 also applies to normal discover rolls made by the user.  He gets Sensor: Triangulated Fire, too, but let's not get too excited about that with an antipode.

Weapons are as you'd expect: AP CCW (teeth).

The Team

Here's where things get a little different from how we're accustomed to seeing our dogs.
First off, they're Marine Corps, so they get aquatic movement.
G: Synchronized is the bit that's fairly unique in Ariadna, though.  This rule is normally seen in more technically advanced list, where there are little servant robots running around.  It's worth summing up, just so I can get used to the idea before game day.


  • Team generates a single order (Irregular in this case as well as its Extreme Impetuous order)
  • Devil Dog is the handler, K-9 is the synched Ghost.  
  • Both models activate together with the one order and must receive the same order.
  • They can target different models, etc; they just need to receive the same order.
  • Any model in the team that can't perform the given order does nothing and is considered inactive.
  • Each model gets its own ARO, but like normal orders they need to do the same thing.
  • The team activates together, so they only create a single ARO opportunity.
  • The K-9 has to remain within the Devil Dog's ZoC. If he isn't, or the Devil Dog goes unconscious, the K-9 becomes IMMobilized.  The K-9 will reconnect at the end of the order in which the conscious Devil Dog ends with the K-9 in its ZoC.
  • Comms Equipment - G: Synch is susceptible to hacking and special ammo in 3rd ed, so watch out!  If your comms get interrupted, the Devil Dog will be isolated and the K-9 will be unusable.

This will be a great fast, tough unit to use in rooting out sneaky enemies and backing up some of the lighter forward rangers.  It will be interesting to see how Extreme Impetuous figures into the equation since the rest of the force is so well trained, but I'm hard pressed to think of a better use of 30 points.


Friday, September 25, 2015

USAriadna - Grunts

No Frostgrave this week on account of us old farts having jobs.  While I'm waiting for the grout in the basement to dry, I'll check out another USAriadna trooper.  Since I've got seven of them now, I may as well look at the grunts.
How does a line trooper in this list stack up against others?  Well, like any romanticized US citizen profile designed by a European, they're pretty freakin awesome!


AVA is TOTAL, for starters, so have as many as you like.  These guys are going to easily be a common fireteam.  They pack a rifle, pistol and knife at their most basic and only set you back 10 points.  When you start to dig into the stat line, that's a heck of a deal for a line troop.

Grunts are 4-2, so they're ponderous compared to a Caledonian Volunteer, but that's because they're wearing about six tons of kevlar, with ARM 3.  BS is a little higher than a normal trooper at 11, and with CC 13 and PH 11, they can hold their own in a bar fight, too.

For abilities, the Grunts come with Shock Immunity, giving them a bit of an edge when taking sniper fire or going up against those Pan-O chuckle-heads and their limitless variety of ammunition.

Rifle or Light Grenade Launcher troops can be the Lieutenant, so there's some commonality with other sectorial lists in that you can gain a cheap Lt.

The Grunt sniper is packing Marksman LX, so he can shoot at BS 17 (11+6) by dropping his Burst to 1.  I'd buy that for a dollar (or 18 pts/0.5 SWC.)

Rifle Grunts can also be forward observers, for only 11 points, which is going to be super handy with those two Muls I'm planning on bringing to town.

All in all, these are some tough and skilled, albeit slow, line troopers with terrific training and equipment.

Friday, September 18, 2015

Getting ready for USAriadna

OK, so we've got a lot of Frostgrave flying around the blog lately and not a lot of horses or muskets.
The 6mm AWI stuff is coming.  The Americans are standing by as we get terrain and bad gu..errr...British figures ready.

Meanwhile, on the SciFi front we are an Infinity hiatus until the new Human Sphere book comes out.
On top of that, painting is on hold while I tile the workshop floor.  Never a dull moment.

In the midst of all this chaos, Carlos decided to wave some more beautiful models around under my nose, so the house is filling up with unpainted USAriadna figures for Infinity.

Since the painting is on hold for a bit, I decided to do some assembly and also dig into the rules of each figure here.  It's really more for my benefit to learn the new profiles and rules, but maybe you'll dig it, too.

Here's the crew so far.  Not pictured are Mul #2, Doctor Murder 112 and an engineer.


Today's subject is the 2nd Irregular Frontiersman, 'Hardcase.'  But we're going to call him Uncle Ted and blast some sweet sweet Cat Scratch Fever.

His special skills are CH: Ambush, Infiltration, and Multiterrain.
  • Ambush gets him all the benefits of CH: Camouflage, plus a decoy marker that deploys like another camo marker.  The opponent won't know what the marker really is until the ambusher attacks or is discovered. 
  • CH: Camouflage makes him -3 to hit, lets him set up as a camo marker, and makes him -3 to discover.  He can also use surprise shot LV1.
  • Infiltration (L1) will be perfect for a Hardcase when combined with ambush and a bow.  He can deploy up to half way onto the board with no risk or onto the enemy's half if he passes a PH-3 roll.
  • Multiterrain gives Uncle Ted the ability to choose a terrain type before the game and ignore that terrain's movement penalties.
The weapon loadout on a Hardcase is pretty minimal. He's packing a Tactical Bow and either a rifle or light shotgun.
  • Tactical Bow: The bow is a fairly uncommon weapon in Infinity, but it's stronger than I expected.  Its damage is the user's PH, which is kind of funny since it's a compound bow.  No need to overthink it, though!  It's also got DA ammo and anti-materiel, so targets take two armor rolls per hit and scenery can be affected,   Remember the scene where Rambo puts a grenade on an arrow? That's all I can think of.  The bow is also silent, so attacks outside of a target's LoF can't cause a Change of Facing.  ARO's aren't even allowed unless a target survives a shot, so I'd better be sure to hit the first time.
The stat line is solid, but he isn't anything crazy.  At 4-4 he's one of the quicker figures in the list.  He's got a very nice CC of 14, but I hope he doesn't have to use it since he's ARM 0.  His PH of 13 means he's shooting arrows that are equivalent in strength to most rifles, but he's no sniper with his slightly above average BS of 11.  Sneaking up close and getting him into the bow's 0-8" +3 sweet spot will be key.  Uncle Ted comes in at either 12 or 14 points and should provide a nice forward ambusher.  Too bad he's not a Forward Observer, too, I'm sure he'd be great at it!


Frostgrave Round 4

Round 4 - Return to the Well of Sorrows


The well lived up to its name this time.  Ben and I played it while Brendan and Alex were otherwise occupied with Haunted Houses.  The amount of bad luck that poured out of this table was just downright amazing.  Ben had a really good game and won almost every single initiative roll of the night.  

The quiet streets of Felstad are about to run red with the blood of my warband, all to the sound of braying goatmen.

My knight does his job well.  He loves to stand in the middle of a table and take on all comers.  With high armor and fight values, he's a great asset.  This was also the game I had where he didn't die afterwards.  You're looking at Sir Knightly III here.
He did a terrific job of tar-pitting several beastmen so the rest of the warband could get on with trying to loot some treasure.

I tried something a little different with setup that worked out well. The apprentice (who is a useless waste of oxygen) set up near an archer, a ranger and a thief.  Grouping the missile attacks like that proved to be very useful when a couple of lucky shots actually hit home.  The ranger managed to cripple Ben's apprentice and take her out of the game early on.

Giant rats.  OK, really giant rats.  These little buggers spoiled a good bit of my strategy, but that's what wandering monsters are all about I guess.  They were just awful, managing to kill two thugs and seriously holding me up in trying to get one of the treasures off the table.  The apothecary, apprentice, archer and ranger had to get involved in order to put the damn rats down.

Prior the the knight engaging he took some brutal damage from Snipey McGoatarcher.  Thankfully the apothecary was ready with a healing potion.  This made all the difference in holding up the herd in the middle of the table for a few turns,  Don't blink, you might miss my wizard's contribution for the evening.  She died shortly after this, even with Fight +5 and 15 HP.

Behold of the power of the Horned One's children.  One of the rats got an arrow shaft through the skull right after this.  But they're rats.  They'll just make more.

So after all this, Ben had a healthy grasp on 3 treasures and I had 2. The final chest was mired in a slugfest between a treasure hunter and three of my grunts.  I finally managed to wrest control of the treasure from Ben after a lucky crit in close combat, and inches from the board edge too!  The Fates weren't too happy about something last night, because a snow leopard showed up to block my exit.  After a few rounds of watching the leopard beat and bloody my dudes, and with Ben closing in on me with his remaining beasties, we called it a night.

But it gets worse!  During the injury rolls, everyone walked away without a scratch except for the wizard.  She died.  Rolled a 2.  Stone cold dead.
Right before I tore up my warband roster, the guys decided that killing off a wizard half way through a 7-week campaign isn't much fun and they let me revive her with a niggling injury instead.   I'll happily pay a 30gc tax each game to avoid starting over - thanks guys!

Sunday, September 13, 2015

The Real Story of Well of Sorrows


It was time for my third game in our mini campaign.  My little band of adventurers were down, but not out.  In terms of wizarding levels I was tied in last place being only level 3 with Ben, and he had scrapped his group and restarted after game one.  Sooooo yeah, read between the lines there...

I needed to shake up the warband a bit and even though I was low in the wizard level count, I had done a decent job of stashing money.  My wizard Krigast (thank you wizard name generator) was going to fire some of his hired cronies.  My barbarian had utterly failed two games in a row dying both times.  He was getting expensive to rehire.  So I placed my 100gc into a "dark" templar instead.  I also dropped a thug and picked up a treasure hunter.  I figure the speed and extra fight would help me out.  Lastly, one of my archers was coming back from an injury so I wouldn't be a man down.  Turns out the summoner I was about to face would put me a man down anyway with her summoning powers!

The game was set and ready to begin.  It was time to face James' Summoner.  Below my warband prepares to dash for treasure while Krigast my witch storms the well with his templar, thug, and archer in support.


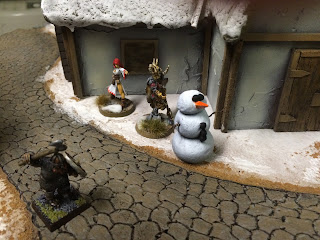
 The summoner got the initiative this round and proceeded to bring forth a minor demon in the form of that really terrifying snowman.  His thief and knight quickly ran ahead to secure treasure and help defend the well.


   Krigast slowly and deliberately moved up with his entourage.  (He had been taken out the last two games.  He didn't want it to happen again!) He cast strength on his templar to beef up his fight.

Not to be outdone by her master, the summoner's apprentice raised an imp to secure a numerical advantage over my warband.  They quickly advanced under the shade of a tree encroaching some treasure chests. The archer then let loose an arrow causing five wounds to one of my thugs.


My lowly apprenticed advanced toward some treasure hidden among the barrels.  She ordered the thief to grab the treasure while she cast some fog to prevent the archer from causing any more trouble. (fog being represented by tissues.  I really need to make better looking fog!)


On the other side of the board, my newly hired treasure hunter was being put to good use.  He quickly scooted up and grabbed the treasure casually placed by the woodpile.  This was starting to look easy!


Did I say starting to look easy?  On the other side of the treasure hunter's house was a thief and a thug ready to cause some problems.  The thief got greedy and snagged the treasure while the thug looked to put the hurt on my treasure hunter who was just minding his own business!  The nerve of that guy.


The thug ran into contact with my treasure hunter, but ran out of activations to take a swing.  My crossbow lady ran as fast as she could to lend support to my treasure hunter.  However she would be an inch too short.  The treasure hunter was going to have to fight the thug on his own.  The dice were cast, and I was able to take out the thug in a single hit!  Thank goodness that thug was nursing a shoulder injury from last game!


Meanwhile, by the well of sorrows, the summoner quickly advanced to the well and took a nice deep drink.  You could almost hear the level up music in the background!  The summoner quickly moved her daemonic snowman between the well and potion shop preventing a direct charge at her and her apothecary.  A smart move blocking a direct path to her.


On the far left flank my thief was able to grab more treasure and scampered off the board uncontested!  Hopefully we would find something good in there later!


A show down for the well was about to take place.  Krigast ran to the well and took a drink from the refreshing water.  While he ducked down to pour water into his cup my crossbow woman took a shot over his head.  The bolt landed true felling the enemy archer in one shot!  This left the summoners apprentice exposed to my thug and archer next round if I could get the initiative!

Off  camera my templar and thug teamed up against the abominable snowman.  With the combination of my templar's +4 fight, the +2 from the spell strength, and +2 for an extra person in combat I was rolling with a might +8!  Needless to say I won the roll and adding my +2 bonus for a double handed weapon I gave him a nice warm hug!  No more snowman...


For the first time all game I was able to get the initiative.  The summoner had high tailed it and fled behind the old potion shop the turn before leaving her apprentice woefully exposed.  Krigast ordered his archer and thug into combat with the apprentice to take her down,  Unbeknownst to Krigast and my crew she must have been training in some form of martial arts!  She quickly dispatched both soldier in one hit each!

In a last ditch effort, the summoner cast a ball of lightning which struck every enemy model within 12" of her.  A few of my warband received the jitters from the shock, but everyone would be fine.  The last piece of treasure was taken off the board by the summoners lackeys and the game ended.


This was a good game for both James and myself.  We both were able to drink from the well and we each escaped with 3 treasure each.  I even leveled up a few times too!  Hopefully this will help me out when I face Alex next game.  He tabled me the last time we met.  And his wizard is currently the most powerful one of us all!

Friday, September 11, 2015

Frostgrave Game 3 - Well of Sorrows

Game 3 was a breakout into two scenarios to make it easier to make the required terrain.
Brendan and I played Well of Sorrows on the village table and Ben and Alex took Haunted Houses on the sewer table.  

Well of Sorrows was a pretty evenly matched game.  We each got three treasure and we each got to the well and survived.  With the poor rolling and casualty count we had both been experiencing, this played like more of a coffee break game for the warbands so they can get back on track.  We managed to have a nice, evenly matched game in about an hour.  Pretty good for us!
Not a single treasure generated a wandering monster, so there was nothing weird to worry about that way, either.

On the other table, none of the houses generated wraiths, so it was more or less a straight-up brawl. Ben pulled a sweet move when the game's one wandering monster, a demon, became bound by him. 

Standings this week:
  • Alex - Level 10
  • James - Level 8
  • Brendan - Level 7
  • Ben - Level 4

Rydia gets creative with Summon Demon by summoning Olaf the Demonic Snowman.
Olaf didn't do much in the way of damage but he did a great job of shielding other warband members.

Olaf moves up to block and the knight does the same.  Rydia and the apothecary head toward the well for a drink as Brendan's baddies move in.

The witch makes it to the well, too, and has himself a sip.  He brought a lot of muscle this time, and manages to complete his objective without getting killed!
The well became the focal point for most of the game's action, with minor skirmishes happening on the flanks where there was some outlying treasure.

Rydia makes a bee-line out of the center of the board under cover of electrical storms cast by the apprentice.

Speaking of the apprentice, she managed to take down an archer and a thug in melee, in the same turn.

Yeah, that's worth seeing a second time.


On the Haunted Houses table, the elves were going for a new record in concurrently summoned evil beings.

The beastmen were on the hunt for treasure and heads.


Some of them were even brave enough to risk running into wraiths by going into the houses.

Would you believe that zero wraiths were encountered?  Well, good for those guys I guess.


Monday, September 7, 2015

Board Two

I put Labor Day weekend to good use trying to finish up some decent terrain for my second Frostgrave board.  I felt I needed some ruined buildings to fight in so I got to work making basic ones.


I figured a few planks would be good fun for running from one section of one house to another so added a few more.  Since I had some already for crossing the sewer sections, it wouldn't look out of place.


For our next mission our group was going to be playing the haunted houses mission.  At first I misread the title and thought it was one house.  But upon rereading it a second time I realized we needed 6 small buildings.  Good think I had plenty of insulation foam and insluation friendly spray paint.  I knocked some out quickly, used the airbrush for a bit of color and added some flock to make them look a bit overgrown.


6 small buildings ready to be checked out Thursday to see if they contain gold...and ghosts.

I then used the spray paint to hit up the five ruined buildings as well.  I gave them the same treatment as the haunted houses too and I believe they will fill out my board nicely.  You can see everything I have for the table below.


This board is 4x4 but we have been playing on a 3x3 section so even though it looks fairly open in this picture, it really isn't.  I'll condense everything for our next game.  

My barbarian has agreed to take some action shots of the rest of the board for me.

Here he is outside the local jail.

Narrowing crossing over the sewer from building to building.  What could go wrong?

Checking out one of my haunted houses.  The only thing spooky is his capacity to be critted in game and then die.

Here he is checking out a ruined building.

Mr. Barbarian decided to climb up into the aqueduct.  Not a lot of water left, but the foliage is starting to grow up there!


Here he is ready to take his wagon clearly loaded down with loot and leaving Felstad.  Next up is to paint those hirst art tiles on all those stairs around the city.  Hopefully I will be able to airbrush them before our game on Thursday to have a nice looking board to play on.

Bolt Action - Causeway Scenario

We switched over to Bolt Action for a bit last night to itch the platoon-level WW2 scratch.
The D-Day scenario book hadn't gotten any love yet in our group, so Brendan brought it over and we tried the Causeway scenario.  The idea is that you've got 2 infantry-only forces attempting to control a crossroads in the center of the table.  
Anything that isn't road is considered difficult terrain, so no running.  The Germans start with a couple of units occupying the objective and then come on with half in a turn-1 first wave and the remainder in reserve.  
The US deploys anywhere outside of 18" of the objective with as much as it wants and can use reserves if it wishes.

This is the first time I've used the Market Garden list, which is SUPER DIFFERENT from playing in North Africa.  You'll see that my troops look like they're more inclined to be participating in Operation Torch. We agreed that the Wargames Fashion Police probably had the weekend off for Labor Day and wouldn't be around to arrest me for my transgressions.


The initial setup, with the US paratroopers and gliders preparing to close on an HMG and some grenadiers.

The US on the move toward the objective.  In hind sight, I spread myself a little too thin and the support units got out of range of the infantry squads once the GI's got onto the road.

My plan was to rush the center by sprinting up the road.  It was an obvious one, and the German reserves moved on and starting throwing pin markers my way. 

Much to the US' chagrin, a nebelwerfer and an SS squad showed up.  Both proved very effective!

In an amazing stroke of luck, the German flame thrower was unable to scorch the GI's,  Pins were still heavy enough that the Americans' right flank ground to a halt, but I made em work for it.


OK, great, a healthy unit of veteran paratroopers is holding the objective.  They should be able to hold it until the glider squad moves up to reinforce.

Wait, Schultzy, is that you?  What are you doing back there? And why do you have a radio....oh no.

A fighter bomber!  Curse you, Schultzy!  

A healthy contingent of Germans is moving in on the objective. It was looking pretty grim for our heroes and it was getting late, so we called the game at the end of Turn 5 with a clear German victory.  It was a fun game and good to get back into Bolt Action.  Talk about going outside my comfort zone, though.  I had mostly veteran infantry, no vehicles and no air support; whose army was this?!